|
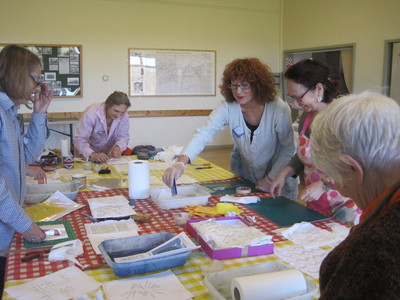
On Monday we had an “in house” printing workshop led by Ann Smith. Ann started the day with a demonstration of preparing acetate sheets and gelli plates with acrylic paint ready for printing. We started printing on paper and in the afternoon we printed on various fabrics - cottons, linen, silk and organza. We used stencils and various mark making tools to make patterns on the printing plates and some people even added their own glitz to bring sparkle to their designs and some started collage. Ann was very generous by letting us use her materials which gave us the opportunity of experimenting with different tools and techniques. The day went very quickly and Ann concluded by giving everybody a couple of luggage labels for printing and we were asked to finish them at home ready for our exhibition in the summer. For the last 10 minutes we all went round to look at each other’s work and it was interesting to see the choice of colours, some very pale and subtle while others were very bold and bright. When discussing the individual designs Ann used a card mount to identify sections which could be developed further. This was a very useful tip which I am sure we will use in the future. It was fun day - we came hope with loads of paper and fabric designs and we thank Ann very much for leading the day and sharing her knowledge.
Report and photos by Ros
0 Comments
A group of MDEG members recently spent a most enjoyable two days taking part in Alexandra's workshop. She introduced the workshop by showing us some of her own stunning bags and cushions. Day one involved creating a multilayered piece of fabric which we then machine embroidered with up to three different thread colours. Alexandra demonstrated each stage, then allowed us time to complete it before showing us the next stage of construction. Many of us choose to buy a bag making kit containing fabric layers, template and bag clasp. Other students chose to make a fabric sample for a cushion, or to embellish a project of their own. Alex brought along a dazzling array of decorative fabrics for us to dip into. The hard art was deciding which to choose! We appreciated that Alex spent time with each of us, advising on fabrics and colour combinations, plus offering ample help for those new to machine embroidery. We all progressed well on the day one and by the end of the day, most students were well on their way to completing a decorated fabric square. With many workshops, embroidery techniques are tried out, yet the samples can end up confined in a drawer once they are taken home. However on day two, Alex carefully guided us through the stages of cutting, sewing and constructing a bag. By the end of the day we had all completed a beautiful bag, or a stunning panel of our own. The bags were each unique, colourful and stunning. Thank you Alex for such an enjoyable workshop. I'm sure that we will all have a go at making more bags in the future. Report and photos by Jackie Bagg.
Thank you so much Jackie - your help is much appreciated and your photos were great! Ros Vivienne Prideaux organised an indigo dyeing workshop earlier this year and kindly agreed to return to help us again. We now have our own indigo vat which Ann S is keeping at her house so watch this space, lots of hours of fun ahead. We dyed a variety of fabrics and threads using samples created in March with resist. During the morning Vivienne suggested we prepare some shibori samples and Maria made an interesting resist using screws - I wonder how it will turn out? We returned home with our samples and told to wait as long as possible before washing out. Below are some photos taken during the day including one of Tiger who was very interested in what was going on. Good job he did not go too near the vat! Thank you Ann for a super day. Report and photos by Ros (and Vernice!)
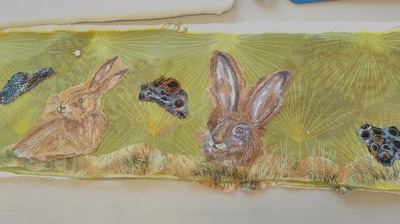
Illustrative pictures using silk organza and hand stitch It took me about 18 months to decide to join the Embroiderers Guild, because I was intimidated by the amazing work I saw on line. However, when a friend showed me the pieces she had made at a workshop I realised I was missing opportunities to learn and improve. Now I sign up for as many workshops as I can, so that I can broaden my repertoire and gain confidence in my own ability. When I first read the description for the Emily Jo Gibbs workshop, my doubts came back, because I cannot draw, and that seemed to be fundamental for this workshop. By the next meeting I had changed my mind - I realised that it didn't matter if I didn't produce a masterpiece, and I might learn despite that. On the day of the workshop, as I looked at Emily's beautiful work, my heart sank. Her portraits, made from layers of silk organza embellished with simple stitches, are stunning, and their apparent simplicity belies the artistic skill that goes into making them. I knew I couldn't ever come close to making something similar. Then I saw a geometric piece and I relaxed, because I knew I could do that.
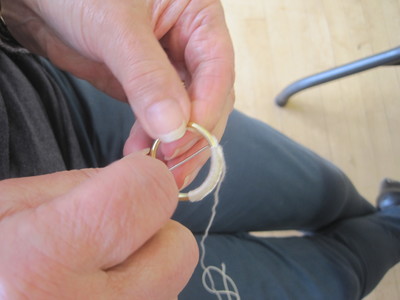
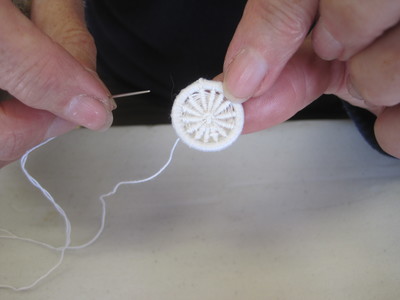
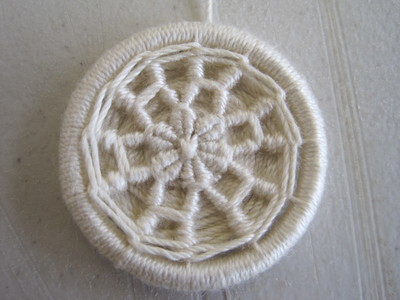
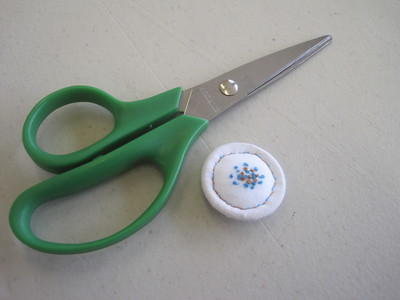
Emily's teaching style is relaxed and generous, and she doesn't hesitate in sharing her techniques to help everyone achieve something they can be proud of. She took us through the stages of creating our own pieces, starting with the geometric piece. We could then move on to something more complex (except for me, I chickened out and stayed within my comfort zone). Emily is undoubtedly a gifted teacher, and her gentle encouragement made us all very happy with what we achieved (even me), and I loved seeing everyone's work at the end of the day, and admiring the skill within the group. I won't be winning any prizes for my piece, but that doesn't matter because I got to spend the day with a lovely group of warm, generous and supportive women, and I went home wearing a smile. Great value for £30! Thank you so much Tricia J for sharing your thoughts and comments about the workshop. Thank you Vernice for the photos. Ros 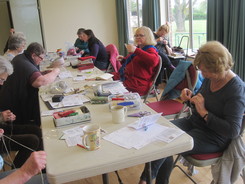 The day after Anna McDowell's interesting talk about the history of Dorset buttons she kindly taught a group of Guild members the various techniques to enable us to create our own buttons. Everybody was given a pack which included the metal ring, thread and the instructions to make a Dorset "cartwheel" button. I was surprised to learn that you used one length of thread and, to begin with, I found 3 1/2 yards quite difficult to handle without getting into knots! Our second button was the Daisy pattern which was worked on a larger metal ring but this had a staggering 5 1/2 yards. We all managed with some results better than others! The final button we were shown was called the "singleton" and for a group of embroiderers this button opened up a great opportunity to express ourselves. By the end of the day, everybody had at least two buttons and some speedy people even had three!
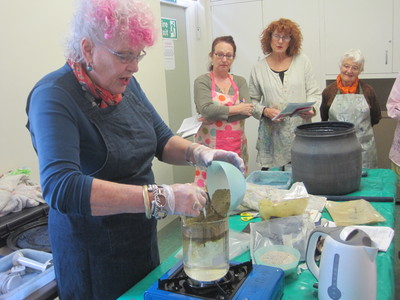
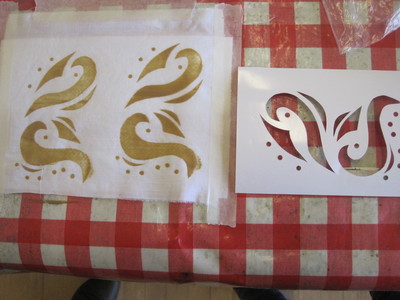
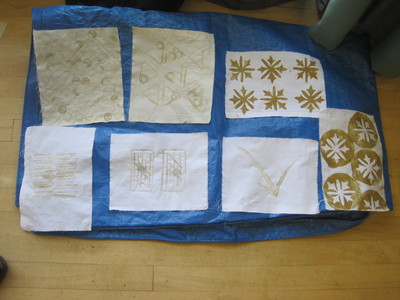
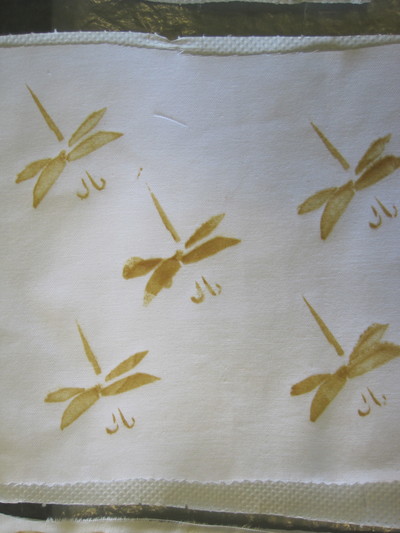
Thank you Anna for a most enjoyable day. Report by Ros Vivien Prideaux’s workshop this month was entitled “Japanese Stencilling”. The group was first shown a vat of indigo dye and Vivien explained it was a mixture of henna, lime and indigo. So we could see the creation of a vat she measured the ingredients on some scales and stirred it. We were then shown how to make stencils and two pastes which acted as resists and then it was play time. Some people cut their own stencils and some used pre cut designs. We then put the stencil on our fabric and used a credit card to scrape the resist over the stencil. The fabrics were then left to dry. By mid afternoon we had all a number of pieces of fabric ready for the final stage which was to dip it in the indigo vat. Vivien was not happy that the vats were creating the right strength of colour for us to dye our materials so it was decided that we would all do some quick test samples and agreed to postpone the workshop for a few months. We can now look forward to stage two at the end of September. Report by Ros
On 23 January I attended the Marlborough Embroiders Guild workshop on how to make a summer garden lampshade with our tutor Nikki Vesey-Williams. Nikki was demonstrating the technique first created by Marna Lunt. It was an extremely enjoyable day with Nikki's teaching being very relaxed and giving all sorts of useful tips about free machine embroidery, such as the appropriate needle for the type of thread used, how to ensure that the thread runs smoothly when running through the machine and also how to ensure that the bobbin is correctly tensioned or lessened off depending upon the texture that is wanted to achieve, amongst other useful details. Firstly we decided how tall we wanted our lampshades to be and also whether they would be used for a table lamp, or hung from a pendant light. This would then give an idea as to how we would have the inner workings of the lampshade set up. We used craft vilene for the base, then used green chiffon material in layers to form the base layer of the shade, giving the impression of grass, fields, hills etc These are bonded together with bondaweb. Once adhered together, a yellow blow pen was used to give an impression of sunrise or sunset and a blue one to denote the sky at the top of the shade. Once the pen ink had dried, we could then set to using a variety of threads and free machine embroidery techniques on the sewing machine to make a set of grasses, foxgloves, daisies and cornflowers on our shades. As we did not want to rush this aspect of the embroidery, we were encouraged to develop the rest of this work at home when we had more time to devote to creating a beautiful work of art. Nikki then went on to demonstrate how we would then make up the shade using double sided tape, lining it with a fine fabric to cover the stitches and give a professional finish. She also showed how we could cover the top and bottom frame with braid to finish off the lampshade. Apologies for delay in posting details of this workshop. Ros
Thanks to Claire Tubbs for the report and photos. Juliette Orton’s day school on Monday was a resounding success: we all benefitted from her inspirational packs and flexible approach to complete a number of pieces (refreshingly unusual to be able to complete pieces in the course of the day). The stitch and tear process was relatively simple but can achieve strikingly diverse effects : many people had a chance to practise their machine-embroidery skills while others worked on complex pieces incorporating a variety of techniques. Everyone, whatever their skills-set, was pleased with their progress. Report and photos by Clare R Thank you Clare! Ros Mandy Nash started her workshop by explaining the fibres and fabrics that can be used with nuno felting and how different types of wools give different effects. Mandy then went on to demonstrate the first technique of nuno felting. She laid out wisps of wool all over a square of muslin in one direction and changed the direction for the second layer. Small pieces of fabric were added for decoration and then the sandwich was put between bubble wrap and a noodle was used for rolling. After rolling and turning numerous times, olive oil soap was added at the end before throwing on the table to form the felt. The second technique also used muslin but this time the wisps of wools did not cover all the muslin, they were laid down to form a chosen pattern. The rest of the process was similar to the first. Mandy was very generous with her tips and suggestions and we left the workshop with a lovely variety of individual samples. Above are examples of Mandy's work.
Thank you for a fun day, Mandy. Report by Ros 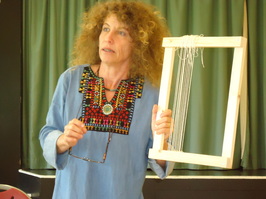 Following a wonderfully stimulating talk on the previous day, Isabelle Jourdan led a one day workshop entitled ‘Wild Woman Weaving’ to a group of would-be needle weavers. As it turned out the title was not a misnomer! Isabelle with her voluminous hair, bare feet, frantic hand gestures, dynamic personality and superabundant enthusiasm was truly ‘wild’ about her craft. Moreover by the end of the day our group of sedate and temperate stitchers had all become infected with her enthusiasm and were champing at the bit to invest some of their own personalities and creativity into their samples. 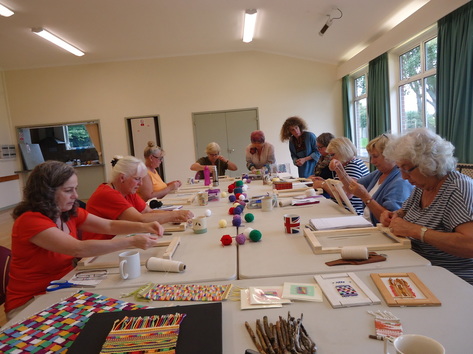 The day started with Isabelle showing the group how to attach the warp threads to the frame. This was more time consuming than at first appeared as each pair of threads had to be attached individually. She then demonstrated the basic needle weaving technique using a single background colour. Once the group had mastered this she provided instructions for six variations of the basic weave, using just one other colour of thread, which amazingly, resulted in the creation of some beautiful and potentially intricate patterns. At the end of the day Isabelle explained how to remove the sample from the frame, and gave suggestions about adding decorative finishes such as fringes, tassels, beads and feathers. The completed sample could then be hung on a twig or small branch to give it a rustic feel.          Although three members of the group were able to remove their samples from the frame, unfortunately there was insufficient time to complete the hangings. However, everyone had developed sufficient skills and knowledge to be able to complete these at home. More importantly, everyone had been inspired by Isabelle to unleash some of their latent creativity through the absorbing medium of needle weaving. 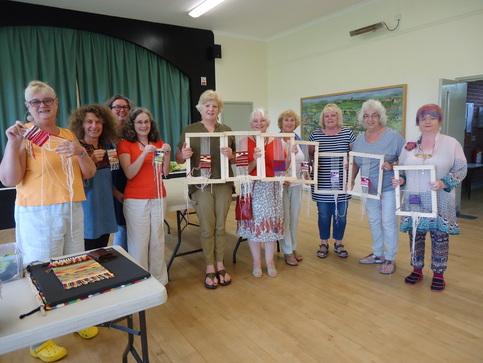 A great day was had by all!
Report and photos by Maria F Thanks, Maria! Ros L |
AuthorInformation in this blog is provided by branch members who have attended the meeting, workshop or event. Categories
All
Archives
August 2020
|


 RSS Feed

|
Marlborough & District Branch is a member of the Embroiderers' Guild, the UK's leading crafts association
* The Embroiderers' Guild website -https://embroiderersguild.com/ * The Guild Facebook page - https://www.facebook.com/embroiderersguild/ * The Guild Pinterest pages - https://uk.pinterest.com/theembroiderers/ |